Friday, November 25, 2011

Dressing of Mythic Proportions


My grandmothers were great cooks. Meema was the grand dame of all things sweet, notably her pecan pie and fudge were all-time family favorites. She made notations on the recipes she'd based her recipes from. Another one of her special talents was writing things down.
Nana, on the other hand did not.  However, she made superb Saturday dinners, replete with china, gold silverware and dried flower arrangements. I remember she made the best vegetable soup I ever tasted, the best chocolate cake, the best dumplings, and the best dressing. However, Nana didn't write down her recipes. And by the time I was old enough to care about cooking or even recording family history, Nana was very, very old and simply couldn't remember. Ever since, we've been going off memory. I've found a cake recipe that I think is very similar to hers. We're still working on the dumplings. Meema, again to her credit, managed to get a bit of Nana's dressing recipe written down.

I decided to give it my best shot this Thanksgiving and recreate her dressing based on Meema's notes.


Here's what I came up with:

Ingredients:
5 chicken backs
1/4 lb ground pork
1/4 lb ground beef

2 cups onion
2 cups celery
1/2 cup chopped fresh sage
One loaf white bread cubed and toasted
Approximately 3 TBLSP bacon grease or grease from frying 6 strips of bacon
Salt and pepper to taste

Instructions:
Brown chicken backs. Reserve fat in skillet then put chicken backs in a large pot, cover with water, bring to boil. Saute onions and celery in bacon grease and reserved chicken back fat. 

Add ground meats, sage, salt and pepper. Cook til done.

Remove chicken backs from water and reserve the stock you've just made. Remove as much meat as you can from the chicken backs and add to your onion/meat mixture.  

Put this mixture into a large bowl and add your bread cubes.
Measure out 4 cups of the reserved water (stock) and add to mixture. Stir well and put in 13x9 pan. 


Bake at 375 degrees until browned and crunchy on top.

Tuesday, September 13, 2011

Soda Biscuits


Have you heard of 7UP Biscuits? I hadn't. 7 UP pound cake, yes, but not 7 UP biscuits. When I saw the recipe, I had to have them. NOW. That being said I was not thrilled with the idea of high fructose corn syrup biscuits. Neither did I want to go out and buy Bisquick, the other main ingredient called for in the recipe. What do I need that stuff for?
So I made adjustments, hoping that they would turn out. I was very happy with the results. Next time, I think I might add a bit of lemon extract or lemon zest.

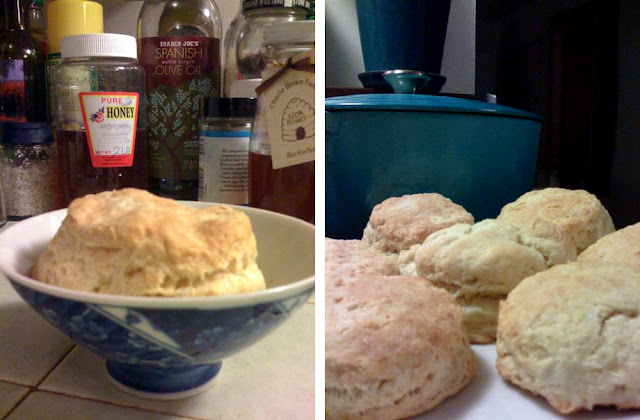
These are so moist and even maintain a modicum of edibility several days after baking, which is quite a feat for biscuits.


Club Soda Biscuits, adapted from a 7 Up Biscuit Recipe.

2 cups flour
3 teaspoons baking powder
1/2 teaspoon salt
2 tablespoons vegetable shortening
1/2 cup sour cream (full fat)
1/2 cup club soda
1/4 cup (1/2 stick) butter
*sugar - add whatever amount you're comfortable with.

Preheat oven to 450 degrees. Melt butter in a 9 inch square pan in the oven.
Mix dry ingredients together, then using a pastry knife cut the shortening and sour cream into the mix. Add club soda and mix until dough forms.
Pat dough out into a 9x9 square to fit your pan. Cut biscuits using a pizza cutter. Place cut biscuits in pan and bake until golden brown.

Sunday, July 17, 2011

Old plates and lasagna


Grills are for boys, ovens are for girls. I have no interest in cooking on a grill. I say, let the boys have it.
Because of this bias o' mine, I followed all the directions for this recipe, but put it in the oven instead.

The plate is from the Venice High School Flea Market, which doesn't get much attention. It stands in the shadow of the Rose Bowl and the Melrose Trading Post. But if you live 'round these parts, give it a shot. It's free and it's every second Saturday of the month.
These plates and tins were under $20.
I altered this recipe quite a bit, I needed to make it work for my needs. I cut the recipe in half, omitted the mozzarella and used frozen spinach because it's what I had.


Original recipe found here:
http://www.foodnetwork.com/recipes/grilled-lasagna-recipe/index.html

Ingredients

  • 1/4 cup grated parmesan cheese
  • Pinch of red pepper flakes
  • Kosher salt
  • 1 clove garlic, grated
  • 1 tablespoon extra-virgin olive oil, plus more for drizzling
  • A large handful of cherry tomatoes (thinly sliced, reserving about 1/3 cup)
  • 8 no-boil lasagna noodles
  • 4 oz frozen spinach or half the box
  • 3/4 to 1 cup ricotta cheese (you can vary this according to how cheesy you want the lasagna to be)
  • 1/3 cup chopped fresh basil (I have a Thai Basil plant, so that's what I used)

Directions

Preheat oven to 350 deg. Combine the ricotta, parmesan, red pepper flakes, 1/4 teaspoon salt, and all but 1/4 teaspoon garlic in a bowl; drizzle with olive oil and toss. Season the sliced tomatoes with salt.

Lay out a sheet of foil on a baking sheet. Drizzle with olive oil, top with 2 noodles side by side and sprinkle each noodle with 1 tablespoon water. Spread some of the spinach, sliced tomatoes and ricotta mixture on the noodles. Repeat to make another layer of noodles, water, spinach, tomatoes and ricotta mixture. Finish each stack with a noodle, 1 tablespoon water and a drizzle of olive oil. Bring the foil together and crimp tightly closed.
Bake until tender, about 10 minutes per side. It's easy to flip the lasagna since you have it snuggly tucked into a foil packet. Let rest 5 minutes. Meanwhile, mix the reserved tomatoes, a pinch of salt, the reserved 1/4 teaspoon garlic and 1 tablespoon olive oil in a bowl. Open the packets and cut the lasagna in half, if desired. Top with the tomato mixture and herbs.
*I found that when you're reheating the leftovers, the bottom noodle gets a really nice brown crispness if you reheat on a baking sheet at 350.

Sunday, July 10, 2011

Sweet Tea Pie


Sweet tea.
Sweet tea is sweet.
Sweet tea is refreshing.
Sweet tea is the wine of the South.
And sweet tea as a pie is heaven!

This recipe comes from Martha Hall Foose who entered this pie in the Mississippi State Fair when she was in high school.
It's got the texture of a pecan pie. My roommate said, it's like candy! It's like a Blow Pop!! I like that.

Here's the recipe, provided by my favorite magazine, Garden & Gun.

Tuesday, February 1, 2011

What I Learned Today

Today was one of those days where all kinds of juicy tidbits about cooking came my way without necessarily seeking them out. Love those days, don't you?

1. Micaceous Clay Pots - Good Food, KCRW


I really need to get one of these!
These unglazed clay pots add robustness to your beans!
Listen to Evan Kleiman and her guest, Felipe Ortega, on KCRW's Good Food, discuss the tradition and benefits of cooking with micaceous clay.

You can buy them on Etsy.


2. No Dutch-Processed Cocoa v. Unsweetened Cocoa


Confused about the difference between dutch-processed cocoa and plain, unsweeteened? I was, but don't be, David Lebovitz explains...

3. No Fail Pie Crust, from America's Test Kitchen via The Bitten Word

The perfect pie crust still eludes me, but this method and recipe could do the trick!

Sunday, January 30, 2011

Milky Way Krispies

Just make these.
You can thank me later.

This recipe is adapted from Mars Bar Krispies found on the Greedy Gourmet.


Milky Way Krispies

6 Milky Way candy bars
2 oz. butter
3 1/2 cup Rice Krispies or generic substitute
7 oz dark chocolate, melted

Line a 13x9 pan with parchment paper leaving an inch or so hanging over the edge of the pan. Spray with nonstick canola spray (makes for easier removal of treats).

Chop 4 of Milky Way bars coarsely. Slice the remaining 2 bars into slices.

Place chopped Milky Way bars in medium saucepan with butter, stir over low heat until smooth. Stir in the Rice Krispies.

Press mixture into pan, refrigerate for several minutes to set. Spread on melted chocolate. Refrigerate again for several minutes to allow the chocolate to harden.

Remove bars from the pan by lifting the parchment paper. Chop rough edges off along the sides and then chop the bars into the size you prefer. Top with remaining sliced Milky Way bars.

Monday, January 17, 2011

Brown Butter Buttermilk Biscuits

Here we go, folks, another biscuit recipe! Aren't you excited? Well, I am, cause these biscuits are right near perfect! Rising nice and tall, great texture, and awesome 'keepability'. By this I mean, biscuits, as a rule, are best straight out of the oven. However, these did very well on day two warmed up in a 300 degree oven. I was very pleased.
The original recipe uses parsley and sage but I always like to try the plain buttermilk biscuits before I start adding flavors. The addition of the brown butter as the glaze was a last minute call.
As you all know, I've tried quite a few biscuit recipes, most call for baking at a higher temperature, but these specify 350 degrees which of course means the baking time is increased. This recipe also uses egg which is pretty rare for biscuit recipes as well.
I really love this recipe and will consider it my go-to biscuit recipe until I find another recipe to replace it! And let's be honest, that could be at any minute.

Adapted from Flour: Spectacular Recipes from Boston's Flour Bakery and Cafe by Joanne Chang

2 1/2 cups unbleached all-purpose flour
1 1/2 tsp baking powder
1/2 tsp baking soda
1 1/2 tsp salt
1/2 cup (1 stick) cold unsalted butter, cut into 8 to 10 pieces plus 2 tblsp, melted
1/2 cup cold buttermilk
1/2 cup cold heavy cream
1 cold egg

Preheat oven to 350 degrees.

Using a stand mixer fitted with paddle attachment, mix together the flour, baking powder, baking soda and salt on low speed for 10 to 15 seconds or until combined. Scatter the butter pieces over the top and beat on medium low speed for about 1 minute, or until the butter is broken down and the mixture resembles coarse crumbs.

In a small bowl, whisk together the buttermilk, cream, and until thoroughly combined. On low speed, pour the buttermilk mixture into the flour mixture and beat for 10 to 15 seconds or until dough just comes together. there will be still be a little loose flour mixture at the bottom of the bowl.

Remove the bowl from the mixer stand, gather and lift the dough with your hands and turn it over in the bowl, so that it picks up the loose flour at the bottom. Turn over the dough several times until all of the loose flour is mixed in.

Dump the dough onto a work surface and pat it into a layer about 1 inch thick. Using a 3 inch round biscuit cutter, cut out biscuits and place them close together on a baking sheet. Gently bring together the dough scraps, pat them into a layer about 1 inch thick and cut our more biscuits until all of the dough is used up. You should have 8 biscuits total. (At this point, the biscuits can be tightly wrapped in plastic wrap and frozen for up to 1 week. Proceed as directed, baking the biscuits directly from the freezer and adding 5 to 10 minutes to the baking time.)

Bake for 40 to 45 minutes, although mine didn't take that long, or until the biscuits are entirely golden brown. While biscuits are baking, brown the remaining butter and brush the tops of the biscuits with the butter when biscuits are done.

Friday, January 7, 2011

Momma Deiss's Pumpkin Cake v. Fine Cooking's Brown Butter Pumpkin Cake


Jonathan is my best friend of 16 years. Lord, that's a long time. Seems like just yesterday he had long hair, abs and listened to Nirvana over and over and over. ugh.

A couple of years ago, his mother generously gave me a couple of their family recipes -- whoopie pies, which I had never heard of until I met Jonathan, and the famous pumpkin cake. Every month or so, JD (Jonathan) would request I make the cake. Then this gorgeous photo on the cover of Fine Cooking of another pumpkin cake said, 'Make me! Make me!' So I did. And it had brown butter in it. And I was happy.

In my opinion, the Fine Cooking cake wins out (the cake on the right). The cake comes out more evenly baked, it's crazy moist, and the brown butter is a tantalizing addition to the frosting, plus there's less sugar.
Of course, Jonathan stands by his mother's. He kind of has to. He would be a bad son if he didn't.
Click here for recipe.