Sunday, October 21, 2012

I Heart NY: A Central Park Bike Tour. Sunday, October 14, 2012.


It all started with a big green park and a little man in a camouflage helmet. His luscious mouth held me in thrall. By his leading, I caught a whiff of park air and that is how I contracted the infection.
The going was rough at the beginning. New York was all honking, move just move, ants up and down, above ground, below ground, weaving between the trash piles. Finding a way took up much of our time. But then our bikes were delivered, our tour guide (Joel) appeared, helmets were adjusted, "LA Woman" was sung and he called me 'baby'. And yet, that wasn't enough. We stood on the sidewalk in front of a cafe tourists would deem 'very good'. I, on the other hand  - your little four letter word would not undo me. 

Pedaling, I remembered an old love. Deep breaths sped me up the hills. At the tops, our guide would speak rapidly and there I would watch the words come out. No matter what was actually being said (something about the duel between Alexander Hamilton and Aaron Burr), just keep talking so I can be voyeur. I could barely see his eyes through his sunglasses but I have always been a sucker for a manly jaw. I laughed out loud at his antics. Our co-bikers from Arizona stood mute. Our Canadian ladies were eager and sweet. 

The Park, oh the Park....here's where I place the blame.
It thrust a crowd of humanity at us, in the form of a marathon. The others not participating in the race, shouted 'Share the Park!' in the only way a New Yorker knows how. We marveled, we were surrounded, there was no escape. And we flew by the endangered Elms, the English, French, and Italian gardens, the Mall, the performers, the views, the history. I wanted to study every green thing, to spend time with that plant whose name I did not know. But there was a schedule. And a man who held us to it.

In my experience travelling, even though my will to do so is driven by landscape and nature, it's always the interactions with people that stick. But here, it couldn't be taken as one individual person, it had to be measured en masse. I cannot isolate, Joel, the tour guide. Full stop. Or Central Park. Full stop. Or New York City. Full stop. I cannot think of Central Park as just a park. It has to go with Joel. It has to go with the City. Of the dozens of times we asked citizens for directions or for help on the subway, as lovely as each person was who took the time to aid us, I could never think of them as distinct entities.They wholly belong to this rigid, yet rippling creature called York, the new one. It has to be all one word - JoelCentralParkNewYorkers. Altogether now like the Germans do! Taking a complex idea and smashing it together into one mouthful of a word. 

So now I am back in LA (ambivalently). I tread through these days in a dream whose feeling has yet to wear off. My heart is a wanderer, wondering, could I? I expected to like you, but not this, not this smile that creeps in at the corners. My method for keeping you close is a song I heard at the Shake Shack on 86th and Lexington by a band called Husky. Here are the lyrics, for you, New York (that is, Central Park, Joel and all New Yorkers).

I went walking in the woods today
Found a path that led me astray
I couldn't leave it

On the bank of a river beneath the trees
I stripped down naked and fell to my knees
I washed my sins away

Morning came and gave the truth away
I wondered if I'd ever return
But as you say, time will pave the way
I just sit and watch our kingdom burn

I went walking in the woods tonight
Trees looked wicked by candlelight
I heard them whispering your name

Far away I saw the city lights
The dreams of mankind burning bright
It was so beautiful

Morning came and took my fear away
I wondered if I'd ever learn
But how will we explain the mistakes we made
When my fear will surely return

I went walking on my own and
Bright eyed spirits guided me home

I went walking in the woods today...


Glade Arch.


A night view.

If anyone's interested, we took the morning tour from Central Park Bike Tours

Monday, September 3, 2012

Summer Weekend Tale: Stew, brownies, liqueur & rice pudding.

When the loneliness sets in on some weekends, I make trips to coffee shops I've been wanting to try, farmer's and flea markets, the bookstore, I treat myself to pizza and pastries. I try to go to the places I'd go to with friends, not wanting to deprive myself of the things I want to do because it's just me. I usually end up talking to and getting smiles from strangers. (LA can be a very friendly place when it wants to be.) I stock up on self-reflection and me-time. 


And of course, I get to cooking.
Stew, brownies, bacon, scuppernong liqueur and coconut rice pudding made it onto the cooking agenda. An odd mix, for sure. The stew was nothing special, the brownies were very chocolatey, the bacon, well it's bacon, the liqueur is sure to be a hit and the pudding was coconuty-creamy. 

Here are the links to the recipes I used:

Hearty Chicken Stew and Butternut Squash & Quinoa (I used rice instead of quinoa. I also added kale)


Coconut Rice Pudding with Ginger Lemongrass Syrup (I didn't make the syrup, I simply sprinkled with cinnamon. I also halved it.)


This is Malcolm's blog. Not sure how old he is - no more than 12? 13? He's Clemence Gossett's son of Gourmandise:
Brownies

Scuppernong Liqueur is simple:
Take a bunch of scuppernong grapes and put in a glass jar, cover with vodka, add 1/4-1/2 cup sugar. Leave it alone for at least 2 months. 

Sunday, August 26, 2012

Old Florida Part 2: Our 'Secret Garden'


Looking at these photos, I wish I could absorb them into my soul, so that the ache will go away. I know you've had that experience where you just want to soak the view in as much as possible. And you stand there and you look and you look and you look and it's still not enough. All I have is these photographs of a time when I was there for maybe an hour or so peering, willing something of it to always stay with me, to not leave me, to not just be images I once encountered through a camera lens. 

There's a wonderful passage from "The Secret Garden" that I think is fitting:
"One of the strange things about living in the world is that it is only now and then one is quite sure one is going to live forever and ever and ever. One knows it sometimes when one gets up at the tender solemn dawn-time and goes out and stands alone and throws one's head far back and looks up and up and watches the pale sky slowly changing and flushing and marvelous unknown things happening until the East almost makes one cry out and one's heart stands still at the strange unchanging majesty of the rising of the sun--which has been happening every morning for thousands and thousands and thousands of years. One knows it then for a moment or so. And one knows it sometimes when one stands by oneself in a wood at sunset and the mysterious deep gold stillness slanting through and under the branches seems to be saying slowly again and again something one cannot quite hear, however much one tries. Then sometimes the immense quiet of the dark blue at night with millions of stars waiting and watching makes one sure; and sometimes a sound of far-off music makes it true; and sometimes a look in some one's eyes."

I do believe that in these moments, so sweetly described by Frances Hodgson Burnett, that we are indeed connected to this earth and to each other and that the earth in these wordless displays of beauty shows us how...how to be.

I want to give credit to my guide for the evening, Mr. Earl Debary (DEE-bary), who is one of those people you can't quite believe is standing next to you. I firmly believe he knows everything there is to know about our grand forest, the Big Scrub. He's seen what I will never see, a little like William Bartram all those long years ago traipsing through Florida with eyes of wonder and gratitude. He sounds like people in the woods should sound, saying things like 'the creek's over yonder'. I marvel that this man is my friend. I wish I had only found him sooner. 

Photos from an August night hike out to Lake Eaton in the Ocala National Forest.


Sunday, August 19, 2012

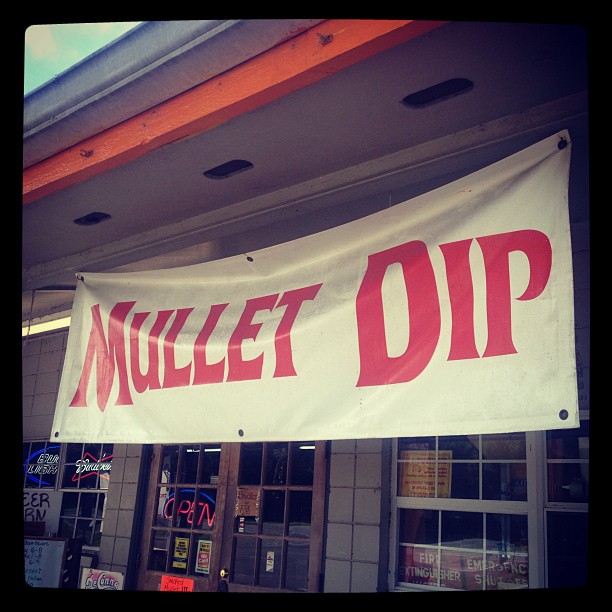
Old Florida: Take a left then a right at the Mullet Dip sign.

I came back from Florida last week. I feel it receding from me - a wave on a shoreline. I can only chase it for a minute before it becomes a part of the great, wide ocean. 
Florida is ever so lush this time of year. The daily afternoon thunderstorms make sure of this. While California has eye-popping sunsets, the Florida summer sky almost takes over the horizon, infringing on its earthly compatriot. Those magnificent cumulus clouds demand homage on their sheer magnitude alone.
My cousin and I ventured up the Gulf Coast for a day, it was meant to be 3 days but I got food-poisoning from eating bad oysters. Even this turn in my luck could not diminish the one day we had on the road. I felt so much was packed into that one day. Not only did we see Old Florida, the beauty that most never get to see, we tasted strongly of the friendliness of the people who live there and those just passing through. A man in Apalach, as the natives refer to Apalachicola, told me, "Whenever you're feeling lower than whale manure, you remember that I'm proud of you." I mean, does it get any better than that? I love how a natural openness to 'strangers' was amplified in this place and came back to us tenfold. 

Here are some of my favorite photos from the trip.

 Oh, beautiful North Florida.
 Farm on 464B.
 Goethe State Forest. My favorite photo from the trip. 464B.
 Y'all got some mullet dip?
 Heading into Cedar Key.
 Boat tour, Cedar Key.
 Boat tour, Cedar Key.
 Dinner view.
 The Grady Market, Historic building in Apalachicola.
 Sky over the water. Apalachicola.
 Downtown Apalachicola.
 Go Gators!!!
Storm comin' in ....Hwy 27.

Wednesday, February 22, 2012

Downton Abbey Made Me Do It


This was one of those days when I was feeling a little broke. After paying some pretty hefty bills, I, of course wanted to bake, but I didn't want to spend any money on extra ingredients. On top of that, I was watching Downton Abbey for like the umpteenth time. Some people drink, I watch period dramas. In the scene with Daisy and William's father, he presented her with these delicious looking biscuity-fruity-sconey looking things. (I was quite impressed, actually, that he'd made them himself?! Go, William's Dad!)

Well, I wanted them to be mine, whatever they were. I started perusing scone recipes. I have never made scones because as some of you will agree, most of the scones I've had have been dry, crumbly, give-me-a -glass-of-water-quick lumps. I found several recipes but most called for creme fraiche. I didn't have creme fraiche but I discovered through Chowhound that sour cream is a good substitute for creme fraiche. The recipe also called for dried currants and nonfat buttermilk. Didn't have these either. What I did have were some embarrassingly old dried cranberries and a smidge of full fat milk. I turned the milk into buttermilk with some white vinegar and decided the cranberries would have to do, I mean they were dried after all. Doesn't that mean they last forever? Ha.
These were so incredibly easy to make - easier than biscuits and way, way easier than pie crust!! I gave some away to my neighbor who raved that she didn't even have to put jam on them to make them taste better. My roommate and friend were ravers, too.

Here's the link to the recipe I riffed off of: (I love the tips here for freezing and storing them)
Flour Bakery's Classic Currant Scones

2 3/4 cups (385 grams) unbleached all-purpose f lour
1 1/2 teaspoons baking powder
1/2 teaspoon baking soda
1/4 teaspoon kosher salt
1/3 cup (70 grams) granulated sugar
1/2 cup (80 grams) dried cranberries (use whatever dried fruit you've got around, raisins even, or chopped dried apple?)
1/2 cup (1 stick, 114 grams) cold unsalted butter, cut into 8 to 10 pieces
1/2 cup (120 grams) cold buttermilk
Scant 1/2 cup (120 grams) cold sour cream
1 cold egg
1 egg yolk, lightly beaten
2 tablespoons sanding sugar, pearl sugar, or granulated sugar (whatever sugar you've got is totally fine)


Position a rack in the center of the oven, and heat the oven to 350 degrees F.
Using a stand mixer fitted with the paddle attachment (or a handheld mixer), mix together the flour, baking powder, baking soda, salt, granulated sugar, and cranberries on low speed for 10 to 15 seconds, or until combined. Scatter the butter over the top and beat on low speed for about 30 seconds, or until the butter is somewhat broken down and grape-size pieces are still visible.

In a small bowl, whisk together the buttermilk, sour cream, and whole egg until thoroughly mixed. On low speed, pour the buttermilk mixture into the flour-butter mixture and beat for 20 to 30 seconds, or just until the dough comes together. There will still be a little loose flour mixture at the bottom of the bowl.
Remove the bowl from the mixer stand. Gather and lift the dough with your hands and turn it over in the bowl, so that it starts to pick up the loose flour at the bottom. Turn over the dough several times until all of the loose flour is mixed in.
Dump the dough onto a baking sheet and pat it into an 8-inch circle about 1 inch thick. Brush the egg yolk evenly over the entire top of the dough circle. Sprinkle the sanding sugar evenly over the top, then cut the circle into 8 wedges, as if cutting a pizza. (At this point, the unbaked scones can be tightly wrapped in plastic wrap and frozen for up to 1 week. Proceed as directed, baking directly from the freezer and adding 5 to 10 minutes to the baking time.)
Bake for 50 to 55 minutes, or until the entire circle is golden brown. Transfer to a wire rack to cool for 30 minutes, then cut into the pre-scored wedges (the cuts will be visible but will have baked together) and serve.
The scones taste best on the day they are baked, but they can be stored in an airtight container at room temperature for up to 3 days. If you keep them for longer than 1 day, refresh them in a 300-degree-F oven for 4 to 5 minutes. Or, you can freeze them, wrapped tightly in plastic wrap, for up to 1 week; reheat, directly from the freezer, in a 300-degree-F oven for 8 to 10 minutes.

Friday, November 25, 2011

Dressing of Mythic Proportions


My grandmothers were great cooks. Meema was the grand dame of all things sweet, notably her pecan pie and fudge were all-time family favorites. She made notations on the recipes she'd based her recipes from. Another one of her special talents was writing things down.
Nana, on the other hand did not.  However, she made superb Saturday dinners, replete with china, gold silverware and dried flower arrangements. I remember she made the best vegetable soup I ever tasted, the best chocolate cake, the best dumplings, and the best dressing. However, Nana didn't write down her recipes. And by the time I was old enough to care about cooking or even recording family history, Nana was very, very old and simply couldn't remember. Ever since, we've been going off memory. I've found a cake recipe that I think is very similar to hers. We're still working on the dumplings. Meema, again to her credit, managed to get a bit of Nana's dressing recipe written down.

I decided to give it my best shot this Thanksgiving and recreate her dressing based on Meema's notes.


Here's what I came up with:

Ingredients:
5 chicken backs
1/4 lb ground pork
1/4 lb ground beef

2 cups onion
2 cups celery
1/2 cup chopped fresh sage
One loaf white bread cubed and toasted
Approximately 3 TBLSP bacon grease or grease from frying 6 strips of bacon
Salt and pepper to taste

Instructions:
Brown chicken backs. Reserve fat in skillet then put chicken backs in a large pot, cover with water, bring to boil. Saute onions and celery in bacon grease and reserved chicken back fat. 

Add ground meats, sage, salt and pepper. Cook til done.

Remove chicken backs from water and reserve the stock you've just made. Remove as much meat as you can from the chicken backs and add to your onion/meat mixture.  

Put this mixture into a large bowl and add your bread cubes.
Measure out 4 cups of the reserved water (stock) and add to mixture. Stir well and put in 13x9 pan. 


Bake at 375 degrees until browned and crunchy on top.

Tuesday, September 13, 2011

Soda Biscuits


Have you heard of 7UP Biscuits? I hadn't. 7 UP pound cake, yes, but not 7 UP biscuits. When I saw the recipe, I had to have them. NOW. That being said I was not thrilled with the idea of high fructose corn syrup biscuits. Neither did I want to go out and buy Bisquick, the other main ingredient called for in the recipe. What do I need that stuff for?
So I made adjustments, hoping that they would turn out. I was very happy with the results. Next time, I think I might add a bit of lemon extract or lemon zest.

These are so moist and even maintain a modicum of edibility several days after baking, which is quite a feat for biscuits.


Club Soda Biscuits, adapted from a 7 Up Biscuit Recipe.

2 cups flour
3 teaspoons baking powder
1/2 teaspoon salt
2 tablespoons vegetable shortening
1/2 cup sour cream (full fat)
1/2 cup club soda
1/4 cup (1/2 stick) butter
*sugar - add whatever amount you're comfortable with.

Preheat oven to 450 degrees. Melt butter in a 9 inch square pan in the oven.
Mix dry ingredients together, then using a pastry knife cut the shortening and sour cream into the mix. Add club soda and mix until dough forms.
Pat dough out into a 9x9 square to fit your pan. Cut biscuits using a pizza cutter. Place cut biscuits in pan and bake until golden brown.

Sunday, July 17, 2011

Old plates and lasagna


Grills are for boys, ovens are for girls. I have no interest in cooking on a grill. I say, let the boys have it.
Because of this bias o' mine, I followed all the directions for this recipe, but put it in the oven instead.

The plate is from the Venice High School Flea Market, which doesn't get much attention. It stands in the shadow of the Rose Bowl and the Melrose Trading Post. But if you live 'round these parts, give it a shot. It's free and it's every second Saturday of the month.
These plates and tins were under $20.
I altered this recipe quite a bit, I needed to make it work for my needs. I cut the recipe in half, omitted the mozzarella and used frozen spinach because it's what I had.


Original recipe found here:
http://www.foodnetwork.com/recipes/grilled-lasagna-recipe/index.html

Ingredients

  • 1/4 cup grated parmesan cheese
  • Pinch of red pepper flakes
  • Kosher salt
  • 1 clove garlic, grated
  • 1 tablespoon extra-virgin olive oil, plus more for drizzling
  • A large handful of cherry tomatoes (thinly sliced, reserving about 1/3 cup)
  • 8 no-boil lasagna noodles
  • 4 oz frozen spinach or half the box
  • 3/4 to 1 cup ricotta cheese (you can vary this according to how cheesy you want the lasagna to be)
  • 1/3 cup chopped fresh basil (I have a Thai Basil plant, so that's what I used)

Directions

Preheat oven to 350 deg. Combine the ricotta, parmesan, red pepper flakes, 1/4 teaspoon salt, and all but 1/4 teaspoon garlic in a bowl; drizzle with olive oil and toss. Season the sliced tomatoes with salt.

Lay out a sheet of foil on a baking sheet. Drizzle with olive oil, top with 2 noodles side by side and sprinkle each noodle with 1 tablespoon water. Spread some of the spinach, sliced tomatoes and ricotta mixture on the noodles. Repeat to make another layer of noodles, water, spinach, tomatoes and ricotta mixture. Finish each stack with a noodle, 1 tablespoon water and a drizzle of olive oil. Bring the foil together and crimp tightly closed.
Bake until tender, about 10 minutes per side. It's easy to flip the lasagna since you have it snuggly tucked into a foil packet. Let rest 5 minutes. Meanwhile, mix the reserved tomatoes, a pinch of salt, the reserved 1/4 teaspoon garlic and 1 tablespoon olive oil in a bowl. Open the packets and cut the lasagna in half, if desired. Top with the tomato mixture and herbs.
*I found that when you're reheating the leftovers, the bottom noodle gets a really nice brown crispness if you reheat on a baking sheet at 350.

Sunday, July 10, 2011

Sweet Tea Pie


Sweet tea.
Sweet tea is sweet.
Sweet tea is refreshing.
Sweet tea is the wine of the South.
And sweet tea as a pie is heaven!

This recipe comes from Martha Hall Foose who entered this pie in the Mississippi State Fair when she was in high school.
It's got the texture of a pecan pie. My roommate said, it's like candy! It's like a Blow Pop!! I like that.

Here's the recipe, provided by my favorite magazine, Garden & Gun.

Tuesday, February 1, 2011

What I Learned Today

Today was one of those days where all kinds of juicy tidbits about cooking came my way without necessarily seeking them out. Love those days, don't you?

1. Micaceous Clay Pots - Good Food, KCRW


I really need to get one of these!
These unglazed clay pots add robustness to your beans!
Listen to Evan Kleiman and her guest, Felipe Ortega, on KCRW's Good Food, discuss the tradition and benefits of cooking with micaceous clay.

You can buy them on Etsy.


2. No Dutch-Processed Cocoa v. Unsweetened Cocoa


Confused about the difference between dutch-processed cocoa and plain, unsweeteened? I was, but don't be, David Lebovitz explains...

3. No Fail Pie Crust, from America's Test Kitchen via The Bitten Word

The perfect pie crust still eludes me, but this method and recipe could do the trick!

Sunday, January 30, 2011

Milky Way Krispies

Just make these.
You can thank me later.

This recipe is adapted from Mars Bar Krispies found on the Greedy Gourmet.


Milky Way Krispies

6 Milky Way candy bars
2 oz. butter
3 1/2 cup Rice Krispies or generic substitute
7 oz dark chocolate, melted

Line a 13x9 pan with parchment paper leaving an inch or so hanging over the edge of the pan. Spray with nonstick canola spray (makes for easier removal of treats).

Chop 4 of Milky Way bars coarsely. Slice the remaining 2 bars into slices.

Place chopped Milky Way bars in medium saucepan with butter, stir over low heat until smooth. Stir in the Rice Krispies.

Press mixture into pan, refrigerate for several minutes to set. Spread on melted chocolate. Refrigerate again for several minutes to allow the chocolate to harden.

Remove bars from the pan by lifting the parchment paper. Chop rough edges off along the sides and then chop the bars into the size you prefer. Top with remaining sliced Milky Way bars.

Monday, January 17, 2011

Brown Butter Buttermilk Biscuits

Here we go, folks, another biscuit recipe! Aren't you excited? Well, I am, cause these biscuits are right near perfect! Rising nice and tall, great texture, and awesome 'keepability'. By this I mean, biscuits, as a rule, are best straight out of the oven. However, these did very well on day two warmed up in a 300 degree oven. I was very pleased.
The original recipe uses parsley and sage but I always like to try the plain buttermilk biscuits before I start adding flavors. The addition of the brown butter as the glaze was a last minute call.
As you all know, I've tried quite a few biscuit recipes, most call for baking at a higher temperature, but these specify 350 degrees which of course means the baking time is increased. This recipe also uses egg which is pretty rare for biscuit recipes as well.
I really love this recipe and will consider it my go-to biscuit recipe until I find another recipe to replace it! And let's be honest, that could be at any minute.

Adapted from Flour: Spectacular Recipes from Boston's Flour Bakery and Cafe by Joanne Chang

2 1/2 cups unbleached all-purpose flour
1 1/2 tsp baking powder
1/2 tsp baking soda
1 1/2 tsp salt
1/2 cup (1 stick) cold unsalted butter, cut into 8 to 10 pieces plus 2 tblsp, melted
1/2 cup cold buttermilk
1/2 cup cold heavy cream
1 cold egg

Preheat oven to 350 degrees.

Using a stand mixer fitted with paddle attachment, mix together the flour, baking powder, baking soda and salt on low speed for 10 to 15 seconds or until combined. Scatter the butter pieces over the top and beat on medium low speed for about 1 minute, or until the butter is broken down and the mixture resembles coarse crumbs.

In a small bowl, whisk together the buttermilk, cream, and until thoroughly combined. On low speed, pour the buttermilk mixture into the flour mixture and beat for 10 to 15 seconds or until dough just comes together. there will be still be a little loose flour mixture at the bottom of the bowl.

Remove the bowl from the mixer stand, gather and lift the dough with your hands and turn it over in the bowl, so that it picks up the loose flour at the bottom. Turn over the dough several times until all of the loose flour is mixed in.

Dump the dough onto a work surface and pat it into a layer about 1 inch thick. Using a 3 inch round biscuit cutter, cut out biscuits and place them close together on a baking sheet. Gently bring together the dough scraps, pat them into a layer about 1 inch thick and cut our more biscuits until all of the dough is used up. You should have 8 biscuits total. (At this point, the biscuits can be tightly wrapped in plastic wrap and frozen for up to 1 week. Proceed as directed, baking the biscuits directly from the freezer and adding 5 to 10 minutes to the baking time.)

Bake for 40 to 45 minutes, although mine didn't take that long, or until the biscuits are entirely golden brown. While biscuits are baking, brown the remaining butter and brush the tops of the biscuits with the butter when biscuits are done.

Friday, January 7, 2011

Momma Deiss's Pumpkin Cake v. Fine Cooking's Brown Butter Pumpkin Cake


Jonathan is my best friend of 16 years. Lord, that's a long time. Seems like just yesterday he had long hair, abs and listened to Nirvana over and over and over. ugh.

A couple of years ago, his mother generously gave me a couple of their family recipes -- whoopie pies, which I had never heard of until I met Jonathan, and the famous pumpkin cake. Every month or so, JD (Jonathan) would request I make the cake. Then this gorgeous photo on the cover of Fine Cooking of another pumpkin cake said, 'Make me! Make me!' So I did. And it had brown butter in it. And I was happy.

In my opinion, the Fine Cooking cake wins out (the cake on the right). The cake comes out more evenly baked, it's crazy moist, and the brown butter is a tantalizing addition to the frosting, plus there's less sugar.
Of course, Jonathan stands by his mother's. He kind of has to. He would be a bad son if he didn't.
Click here for recipe.

Wednesday, November 3, 2010

Pan de Muerto for a Day of the Dead Party

Pan de Muerto is the bread made for Dia de los Muertos, Mexico's Day of the Dead.
This is a holiday I can get behind. I'm the kind of girl who if she could time travel would not go to the future, but to the past. I'm the girl who designed cemeteries in grad school. I'm the girl who traveled around North Carolina, Georgia and Florida making rubbings and molds of ancestors' gravestones. It took me 12 years of living in LA to get around to celebrating this holiday. I'm not the biggest Halloween fan - making a costume is just too much trouble, yet spending a weekend planning a party and several hours making bread, well, that I'll do!

I found this recipe in Fine Cooking:
http://www.finecooking.com/recipes/pan-de-muerto.aspx?

How could I resist making something so adorable? I made a few mistakes along the way - like turning the oven on prematurely during the bread's second rising (I put it in there because with the pilot light on it's nice and warm). I also made a mess of the 'bones' that decorate the top of the bread. Oh well. The bread didn't seem to suffer any for not completing the second rising or not having perfect bones. This bread is similar in texture to challah and brioche but with the lovely addition of orange. Through a sleepy sugar coma, induced by cherry cordial, 2 kinds of hot chocolate, one being spiked with bourbon, and double chocolate cookies my guests made it to the grand finale - the Pan de Muerto! Check it out.

Sunday, October 31, 2010

The 24 Hour Chocolate Chip Cookie


Don't let these pretties fool you. They're not that good. 

I believed the hype. A guy I worked with said they were amazing and had a party devoted to them. The New York Times featured a three page article on them. The last straw was an email from Tasting Table highlighting David Lebovitz's recipe for them. Yeah, I don't get it.
Supposedly, letting the dough refrigerate from 12-24 hours greatly improves our beloved chocolate chip cookie. Bah. I was expecting a truly sensational cookie. A mesmerizing blend of flavors, a melt in your mouth epiphany. My coworkers happily played test testers to my efforts and while they did indeed hastily eat them, I wanted an 'eyes rolling into the back of the head' kind of reaction. Didn't happen.Maybe my expectations were too high?
I don't know, but I went back to making this recipe I found a couple of years ago in the Los Angeles Times, not to be confused with the aforementioned New York Times. Ahem. This cookie has been presented to us by the fabulous LA eatery, Milk. Check 'em out.
Milk's Ooey-Gooey Double Chocolate Cookies
Servings: 1 1/2 dozen
Adapted from Milk.

1/4 pound (4 ounces) unsweetened chocolate
4 tablespoons ( 1/2 stick) butter
3 eggs
2 teaspoons vanilla extract
1 cup sugar
1/2 cup flour
2 tablespoons Valrhona cocoa powder
1/2 teaspoon baking powder
1/2 teaspoon salt
1 pound Valrhona bittersweet chocolate (chunks or chips)
1-3/4 cup chopped, roasted walnuts

1. In a bowl set over a pot of simmering water, melt the unsweetened chocolate and butter. Remove from the heat and cool slightly.
2. In the bowl of a mixer with a paddle attachment, or in a large bowl using a fork, combine the eggs, vanilla and sugar. Mix just until incorporated and set aside.
3. Sift together the flour, cocoa powder, baking powder and salt into a medium bowl. Set aside.
4. Add the melted chocolate to the egg mixture and mix just until combined. Stir in the sifted dry ingredients and mix just until combined, then stir in the bittersweet chocolate and walnuts.
5. Cover the batter with plastic wrap and refrigerate for at least 1 hour to chill thoroughly. Heat the oven to 350 degrees.
6. Divide the dough into 18 portions. Grease your hands (to prevent the dough from sticking) and shape the portions into balls. Place the balls on a greased, parchment-lined sheet pan, leaving 2 to 3 inches between each.
7. Bake until the edges of the cookies are just set and the center is still soft, 10 to 12 minutes, rotating the pan halfway through. Place the cookies, still on the parchment, on a rack and cool completely before serving. They will be very soft.

Monday, October 18, 2010

Southern Cakes: Coconut Layer Cake or the "Coconut Butterball Cake"


I am constantly sifting through recipes for Southern cakes. I have a quite the collection: Caramel, Lady Baltimore, Hummingbird. And I intend to make them all. It's only fitting that the part of the country with the biggest sweet tooth has such an amazing cake tradition. Coconut moved to the top of the list when I saw an episode of America's Test Kitchen on PBS featuring the Coconut Layer Cake. I love anything to do with coconut. I am particularly enthusiastic about the use of coconut oil as a lotion. I could slather that stuff on all day.

Back on topic, Brooke. The adorable Christopher Kimball and Bridget Lancaster were looking for ways to intensify the flavor of coconut within the cake itself. Usually, you get lots of coconut punch in the frosting, but not so much in the cake. Their solution was to add canned cream of coconut. Between the cream of coconut, the coconut extract and the toasted coconut on top, the coconut flavor really does come through. So no worries there. Of course, the thing I couldn't get over with this cake was the amount of butter used in the buttercream frosting. I guess I took the 'butter' in 'buttercream' for granted all these years. Or maybe I should say, I lived in blissful ignorance.

So. I guess you're probably wondering if you should make this cake. Yes, it will take up most of your day, and yes, there are a lot of ingredients, but this is a beautiful cake with great flavor, especially if you're a lover of coconut. And butter. Of course. Don't even think about making cupcakes instead.


Coconut Layer Cake from America's Test Kitchen
Makes one 9-inch, 4-layer cake
Cream of coconut is often found in the soda and drink-mix aisle in the grocery store. One 15-ounce can is enough for both the cake and the buttercream; make sure to stir it well before using because it separates upon standing.
Ingredients
Cake
  • 1 large egg
  • 5 large egg whites
  • 3/4 cup cream of coconut
  • 1/4 cup water
  • 1 teaspoon vanilla extract
  • 1 teaspoon coconut extract
  • 2 1/4 cups cake flour (9 ounces), sifted
  • 1 cup granulated sugar
  • 1 tablespoon baking powder
  • 3/4 teaspoon table salt
  • 12 tablespoons unsalted butter (1 1/2 sticks), cut into 12 pieces, softened, but still cool
  • 2 cups packed sweetened shredded coconut (about 8 ounces)
Buttercream
  • 4 large egg whites
  • 1 cup granulated sugar
  •   pinch table salt
  • 1 pound unsalted butter (4 sticks), each stick cut into 6 pieces, softened, but still cool
  • 1/4 cup cream of coconut
  • 1 teaspoon coconut extract
  • 1 teaspoon vanilla extract
Instructions
  • 1. For the Cake: Adjust oven rack to lower-middle position and heat oven to 325 degrees. Grease two 9-inch round cake pans with shortening and dust with flour.
  • 2. Beat egg whites and whole egg in large measuring cup with fork to combine. Add cream of coconut, water, vanilla, and coconut extract and beat with fork until thoroughly combined.
  • 3. Combine flour, sugar, baking powder, and salt in bowl of standing mixer fitted with paddle attachment. Mix on lowest speed to combine, about 30 seconds. With mixer still running on lowest speed, add butter 1 piece at a time, then beat until mixture resembles coarse meal, with butter bits no larger than small peas, 2 to 2 1/2 minutes.
  • 4. With mixer still running, add 1 cup liquid. Increase speed to medium-high and beat until light and fluffy, about 45 seconds. With mixer still running, add remaining 1 cup liquid in steady stream (this should take about 15 seconds). Stop mixer and scrape down bowl with rubber spatula, then beat at medium-high speed to combine, about 15 seconds. (Batter will be thick.)
  • 5. Divide batter between cake pans and level with offset or rubber spatula. Bake until deep golden brown, cakes pull away from sides of pans, and toothpick inserted into center of cakes comes out clean, about 30 minutes (rotate cakes after about 20 minutes). Do not turn off oven.
  • 6. Cool in pans on wire racks about 10 minutes, then loosen cakes from sides of pans with paring knife, invert cakes onto racks and then re-invert; cool to room temperature.
  • 7. While cakes are cooling, spread shredded coconut on rimmed baking sheet; toast in oven until shreds are a mix of golden brown and white, about 15 to 20 minutes, stirring 2 or 3 times. Cool to room temperature.
  • 8. For the Buttercream: Combine whites, sugar, and salt in bowl of standing mixer; set bowl over saucepan containing 1 1/2-inches of barely simmering water. Whisk constantly until mixture is opaque and warm to the touch and registers about 120 degrees on an instant-read thermometer, about 2 minutes.
  • 9. Transfer bowl to mixer and beat whites on high speed with whisk attachment until barely warm (about 80 degrees) and whites are glossy and sticky, about 7 minutes. Reduce speed to medium-high and beat in butter 1 piece at a time. Beat in cream of coconut and coconut and vanilla extracts. Stop mixer and scrape bottom and sides of bowl. Continue to beat at medium-high speed until well-combined, about 1 minute.
  • 10. To Assemble the Cake: Follow illustrations in chart below. Cut into slices and serve. (Wrap leftover cake in plastic and refrigerate; bring to room temperature before serving.) 

Monday, October 11, 2010

U-pick Farms and Canning in Little Rock, CA


I don't advise you go picking fruit in the desert during the hottest weekend of the year. BUT you might get a deep-fried Twinkie and venison jerkie out of it if you stop by Charlie Brown Farms.
http://www.charliebrownfarms.com/
Both exceeded expectations.

Admittedly, Alissa, my co-canner and wanna-be farmer for the day (also sporting a horrified look that I was actually going to eat that Twinkie!), and I did have a good time although threatened with heat stroke, overly amorous dogs and unripened fruit. We managed to get enough fruit for batches of apple and plum butter, spiced peaches with vanilla, and peach liqueur. Truly, a bumper crop. 

Plum Butter  from "Well Preserved: Small Batch Preserving for the New Cook" by Mary Anne Dragan

Makes 5 to 6 8oz jars

"Serve this mellow, richly flavored butter with roast pork or turkey, or as a spread on fruit or nut quick breads."

12 cups coarsely chopped, pitted plums (we used sugar plums)
1 cup water
4 cups sugar
1/2 tsp cinnamon
1/2 tsp ground cloves

Combine the plums and water in your preserving pot. cover and simmer over medium heat for about 20 minutes, or until the plums are tender. Stir occasionally. Remove from heat. Puree in food processor.

Prepare the preserving jars.

Return the puree to the preserving pot. Stir in the sugar until iti is dissolved. Simmer over medium-low heat, stirring almost constantly, for 30 to 40 minutes, or until the mixture is somewhat thickened. Stir in the spices during the last 10 to 15 minutes of the cooking time. Test for doneness if desired.
Remove from heat. Spoon the butter into hot, sterilized jars, leaving a 1/4" head space. Release the air bubbles. Wipe the rims clean. Seal according to manufacturer's directions. Process the jars in a boiling water bath for 10 minutes.